How do you offroad?

Your Vehicle

RSS

Blog posts of '2019' 'August'

Guides: What are Aftermarket Upper Control Arms and When Do I Need Them?

What are Aftermarket Upper Control Arms and When Do I Need Them?


Anyone who spends more than 5 minutes on an offroad forum will find the topic of aftermarket control arms, also known as UCA, discussed quite a bit.  But you may wonder: what does an upper control arm do?

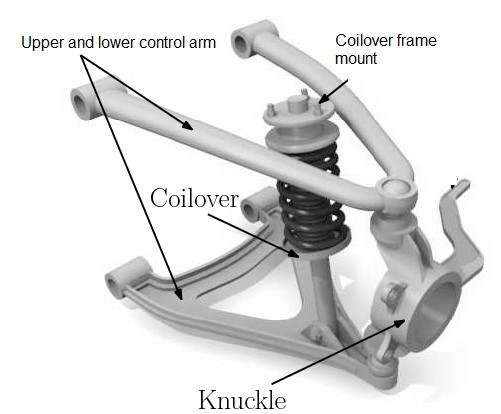
Upper control arms are found on independent front suspension (IFS) vehicles and generally connects the top of the spindle to the frame.  The UCA is generally not a load bearing piece of an IFS suspension; rather, its purpose is to guide your spindle in a pre-determined motion when your suspension cycles up or down.  Load is usually handled by the lower control arm, which connects to the lower portion of the spindle.  


What makes an aftermarket UCA an upgrade over my factory arm?

There are 3 major differences between a factory UCA and an aftermarket UCA:

Strength:

Even though the upper control arm may not support load there will still be a degree of forces transferred through the spindle into the upper arm.  A number of OE style arms are formed from sheet metal (for instance, in Nissan and Toyota applications).  Aftermarket arms are usually made from DOM tubing or they're forged in steel or aluminum rather than being formed in sheet metal.  Sheet metal arms are advantageous for a OE manufacturer, they can be mass produced in huge quantities quickly and inexpensively.  Aftermarket arms are fabricated in smaller batches and are generally more expensive due to the materials being used.  You'll notice the difference in cost if you look up your vehicle on Rockauto or other OE parts houses and compare to aftermarket arms.  Aftermarket options are significantly stronger than factory arms.

The pivot point, where the UCA meets with the spindle is also much stronger in aftermarket options. This pivot point takes shape in the form of a ball joint or uniball.  We generally prefer ball joints in most cases (especially if they're user-greasable), as the pivot point is booted to prevent the ingress of dust, dirt, and road salt.  They require less frequent service or maintenance.  Uniballs are generally found on high performance / racing applications and aren't a great option for daily-drivers or weekend-warrior type builds.  They have a shorter service life than ball joints and are known to be noisy as they wear through their teflon liner.  

Clearance:

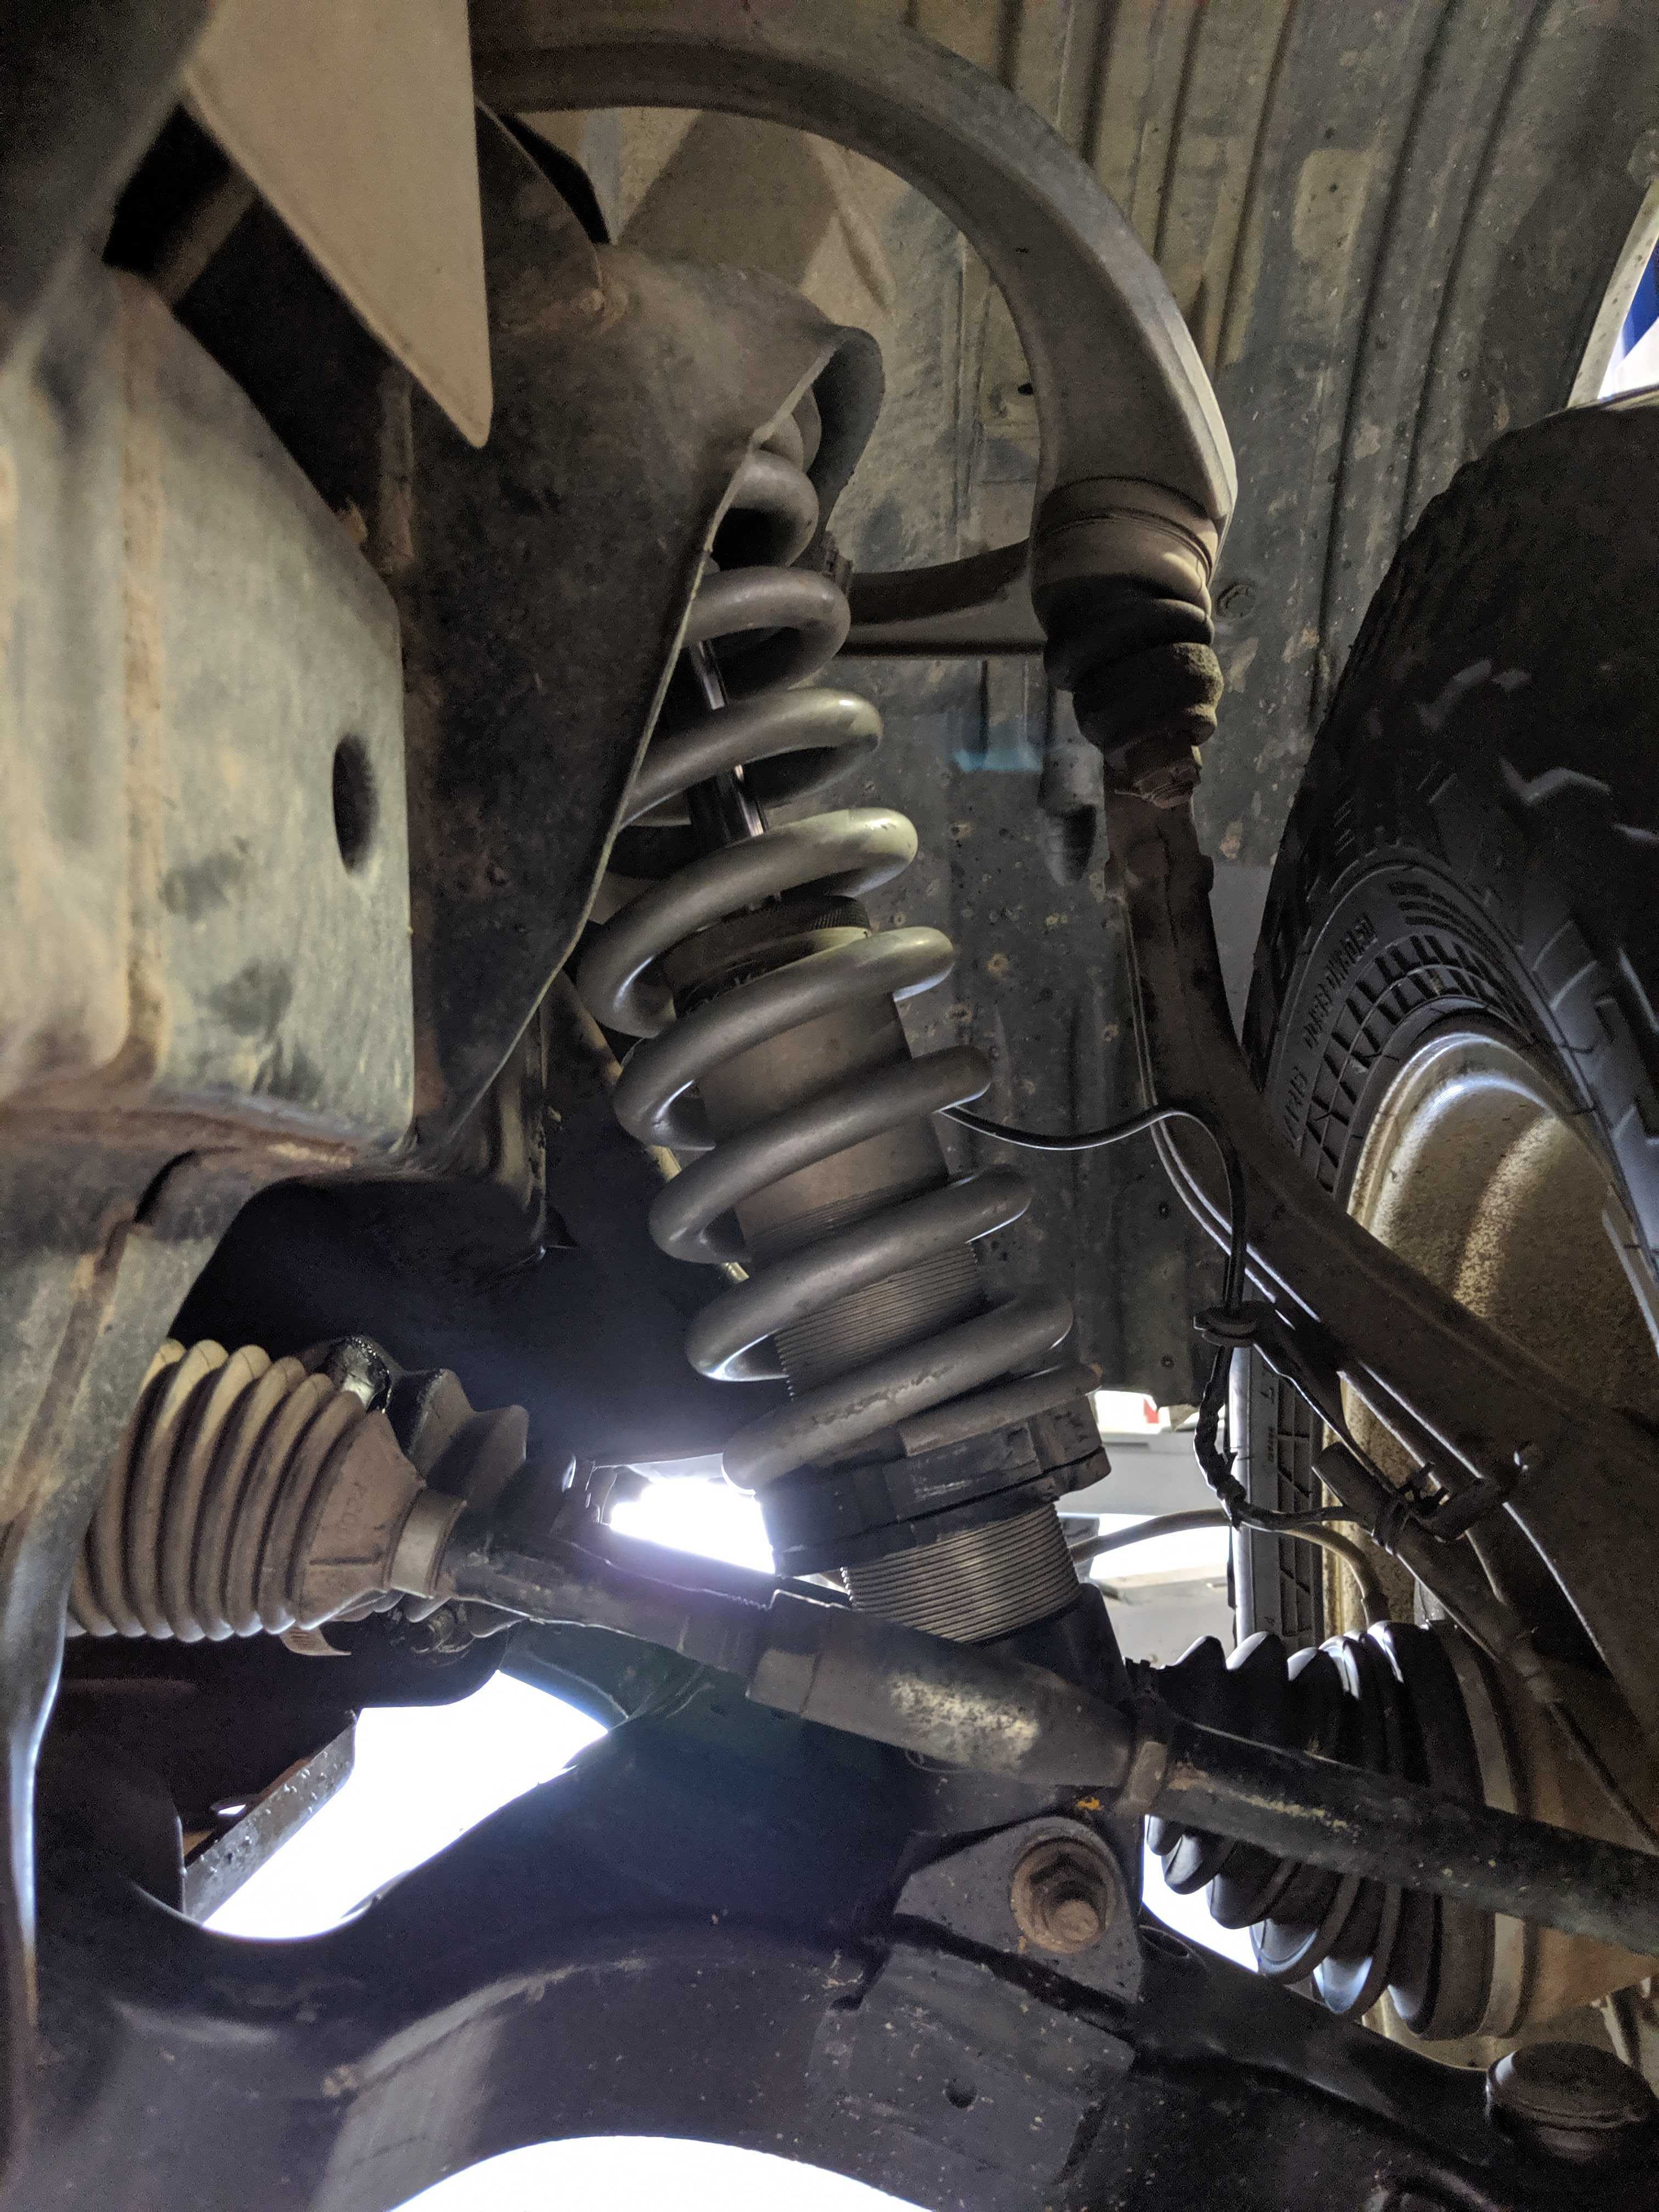
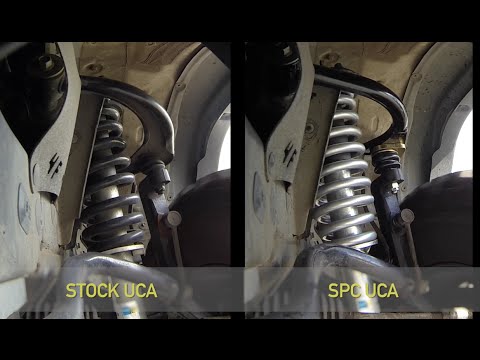
A common problem with factory upper control arms can be limited clearance at the coil bucket and at the spring.  This is an especially common problem in Nissan Frontier and Nissan Xterra applications and is commonly referred to as coil bucket contact (or CBC).  Aftermarket UCAs are designed to provide the clearances needed so you can beef up your suspension and not have to worry about your UCA contacting suspension components it shouldn't. 

Geometry Correction & Adjustability:

Most aftermarket arms come built with extra caster so when you beef up your suspension, you can keep your alignment in spec.  This is done by slightly altering the geomertry of the spindle.  Aftermarket options from Dirt King, for instance, have this correction statically integrated into the UCA and it is non-adjustable.  Aftermarket options from SPC are manufactured to allow for an alignment shop to adjust caster and camber by shifting the position of their unique ball joint design.  


When do I need aftermarket Upper Control Arms?

There are lots of misconceptions about when you need aftermarket upper control arms.  You will often see blanket statements on forums or Facebook groups such as “If you have X amount of lift, you need aftermarket UCAs.  No questions asked”. 

The answer to this question ultimately comes down to how you chose to lift your vehicle. 

Preload Lifts and Lift Springs:

If you lift your vehicle with lift springs or preload (for example, with Bilstein 5100 front struts or OME / Dobinsons front lift springs), your suspension will still cycle in the exact same range of motion.  This means that your full droop location and your maximum compression position will be the same.  Lift springs / preload simply make your vehicle settle at a different spot in your overall suspension stroke. 

Spacer Lifts & Extended Length Coilovers:

If you chose to lift your vehicle by increasing the extended length of your shock, your range of motion will change (for example, Radflo extended travel front coilovers or a Rough Country front strut spacer).  Lengthening your shock means you will have the same amount of travel, just moved down in position.  For instance, if your OEM shock is 18” extended length and 13” collapsed length and add a 1.5” tall spacer to it, your extended length is now 19.5” and your collapsed length will be 14.5”.  Overall stroke remains the same but requires your upper control arm to drop lower to compensate for the change in position / increased length. 

For Nissan applications, people find their OEM arm will crash into the top of the coil bucket when using spacer lifts or extended travel lifts (coil bucket contact / CBC).  For Toyota applications, the arm can end up contacting the spring.  Both are not ideal and can be solved by installing aftermarket upper control arms. 


What style of Aftermarket UCA is best for my application?

There are two primary styles of aftermarket upper control arm.  The first uses bushings at the frame mount with a booted ball joint at the spindle mount.  The second uses heim joints at the frame mount with a uniball / spherical bearing at the spindle mount. 

Balljoint Arms:

This style of arm is the most popular.  The balljoint is booted and greaseable which makes it very resilient to debris and poor weather.  The SPC implementation also has a high amount of adjustability, as previously mentioned.  The bushings at the frame mount also help to dampen vibration and prevent the driver from feeling every little bump and jolt.  Modern ball joints are extremely strong and if well maintained will be very resistant to failure.   

Uniball Arms:

Uniball Arms are very popular in racing applications because the heimed frame mounts allow more forces to be passed into the vehicle which allows the driver to be more in tune with what is happening at the tire.  At 100+ MPH in the desert this feedback is very valuable.   The uniball is also the arm of choice for racing applications because a uniball generally has a higher range of motion than balljoints.  This allows suspension travel to be pushed to greater degrees.  This is not a concern in non-racing applications however; your axles / cv's / lower ball joints will bind far before an aftermarket ball joint will.  The service interval for a uniball is more frequent than a booted ball joint.   Experts recommend servicing your Teflon lined uniball once every 3-4 oil changes. 

Thanks for reading! We hope this was a good intro to upper control arms and how they work.  Below are links to some arms we offer on our site.  


Toyota Tacoma SPC Arms 

Toyota/Lexus 120 & 150 Series SPC Arms

Nissan Frontier/Xterra SPC Arms

Nissan Frontier/Xterra Titan Swap SPC Arms

Member Content: Spam, Beans, and 4x4s

Hey guys!  We asked one of the members of our cooperative to write up a guide on organizing group rides.  His name is Nick Cornell and he helps lead the CAMO group which is located on the east coast.  He's super rad, and this is what he wrote!

Spam, Beans, and 4x4s


Its glamorous really, the foliage has changed to a crisp auburn and fiery orange as a cool breeze blows through your cracked window. A steaming Columbian roasted coffee sloshing around in a fresh Yeti tumbler. A convoy of clean modern 4x4s walk over obstacles through the tree lines as a perfectly placed drone captures the best aerial footage. Long time friends together, headed to the perfect pre-planned camp location, soon to set up a large contained camp fire while drinking smelly IPAs and telling stories. Perfection. The night sky is so clear you can see the mil……….*THWACK* WAKE UP!

My name is Nick Cornell, I run Central Appalachian Mountain Overland with three close friends, Camden Nichols, Nick Palko, and Steve Vilbert. Central Appalachian Mountain Overland (CAMO) was something that just kind of happened. My group of friends was always interested in motorsports. We started off like any 16-19-year olds: With Riced out econo-boxes and Subarus. We didn’t really think it at the time, but looking back, it’s pretty comical. As we got older the cars went away and the 4x4s became the new flavor. I actually didn’t get rid of my riced out race red Ford Focus by choice, unfortunately, she met her demise by means of a 10 point buck. I purchased a 2012 Nissan Frontier. I think I still have the text messages that I sent to my friends shortly after bringing it home. Something to the tune of, “I’m leaving this one stock. Can’t believe how much money I wasted on that car.” ….Sure. Good plan.

Our very first trip was about as comical as an “overland” trip can be. I was in a bone stock Nissan Frontier, Camden was in a Red Cherokee from the thunder dome, Brennan was driving a full size short bed single cab F-150 from back when you were still dating cheerleaders, and Palko was in a brand new, sticker still on the back glass - Chevy ZR2 Colorado. I hastily downloaded a GPX file of a well known dual sport motorcycle route and we set off for West Virginia. I didn’t disseminate the maps to any of my friends and didn’t really even explain what we were doing and where we were going.


We pounded pavement into Dry-Fork West Virginia after a brief holdup to add some diff fluid and friction modifier to the Ford. I came over the CB (I think we had CBs for this trip) and said, “Hey guys, we turn right in a couple hundred feet.” A few seconds later, my eyes caught the trail and I jacked the brakes and dropped down about fifteen feet directly into the Dryfork River. (This was part of the trail) Now, it had been raining heavily in the preceding weeks and the river was high; however, this is a one way, my stock Frontier wasn’t turning around and I surely wasn’t backing up what I had just gone down. I clicked it into 4-Hi and gave it the beans out of pure fear and ignorance. Smashing and banging along the bottom of the river, the water began to creep deeper and deeper. I looked out the driver’s window to watch cool West Virginian River water splash up to my headlights. Full Pucker. Finally, 100 yards later, I was on dry land and the truck didn’t drown. One by one we all made it across and celebrated this small victory with a trailside beverage.

As the sun started to set and our stomachs started to crave camp food and luke warm, shaken beers. We decided it was time to find a camp spot. Well, suffice to say, the dead center of the George Washington National Forest doesn’t necessarily have a surplus of clearings. Finally, we came across a great spot, got a fire going, set up our tents, and started one of the best parts of the trip.

The following morning, we set off and continued East in the GWNF. *THWUB THWUB SCHREEECH THWUB THWUB* The Ford tossed a belt. “Tossed” is probably the wrong word. It was more like a fibrous explosion. No matter, Brennan had a spare. Sort of. The spare was his older belt that was in decent condition but it was sized just slightly off. Brennan deleted his AC so the stock belt size was incorrect. His off the shelf belt was working but slightly undersized. As we continued on, Brennan noticed his belt had come off once again. Upon inspection, we found that there were only 3 strands of belt surviving. Something was causing the belt to get tossed into a bracket near the water pump. Yikes. We were near Snowshoe WV at the time. I remembered that I had Gorilla tape in the truck. We tediously recreated a belt from the Gorilla tape as a Hail Mary attempt at getting us 40 miles North to Elkins to fix the truck and get home. Miraculously, the Gorilla tape held and we were able to fix the truck and return safely home to Pennsylvania.

At this point we were hooked. I learned a lot of valuable information from that trip and all of our trips to follow. Arranging an offroad trip or managing a club is a lot of work. Below are a few tips that will help you arrange an offroad outing or partake in one:

1.   Bust out the paper maps

  • When planning a route find a paper map source that fits the area that you wish to travel. Physically trace the route in a sharpie marker. Along the way, circle locations of parts stores, gas stations, beer distributors, and potential camp spots as well as any other points of interest. I love “Purple Lizard Maps.”

2.   You’re the captain now

  • Let’s face it, you’ve done all of the leg work, you sent out the gpx. files to you crew, encouraged everyone to download it, and alas, you’re the only guy with the route. Relax. Everyone is just happy they’re not at work. You can alleviate the pressure on yourself with a good co-pilot or a good heads up display of your track. I really like GAIA GPS. I paid for the pro version and purchased a 60 dollar tablet that has GPS capabilities from Amazon. *IMPORTANT* Download the base layers of the maps to your tablet. Cram the biggest card in that thing that you can and achieve the best granularity possible. This way, even without service, you can watch yourself follow your perfectly plotted path.

3.   Can you hear me now?

  • Coms, Coms, Coms. This is always a topic of discussion and debate. Regardless of what you choose, it’s imperative that everyone in your group understands how important maintaining communications is. In our experiences, the trusty 2-way radio is the answer for a few reasons:

                a.  No one can mess it up
                b.  No installation
                c.  They cost 20 bucks
                d.  You can walk away from the vehicle and still maintain coms
                e.  Your spotter can hold his radio and guide you via radio

4.   Are ya’ made of spare parts, bud?

  • Bring spares of common failure parts. Belts, U-Joints, a headlight bulb, and anything specific to your rig that could be hard to find if you needed it. You will want to have an adequate tookit as well. A cordless impact gun can make a trailside repair go much, much smoother.

5.   The Shepherd

  • It’s nerdy but important: You need to have a brief driver meeting before you roll out. One of the most important trail rules to follow is that if you lose sight of the guy/gal behind you, you stop until you see them. This keeps everyone together. Make this well known before you head out.

6.    “That Guy”

  • There will always be one. He/she doesn’t listen, they don’t want spotters, they tear stuff up, they drive recklessly, etc. Get rid of that guy. While it’s awesome to have as many people as possible, its more awesome to not worry about “that guy.”

7.   "WHO ARE YOU PEOPLE”

  • You’re probably wondering how you get people interested in going with you. Well. I’m wondering the same thing. You’re going to find that there are a LOT of people who just simply build vehicles with no intent to use them. Seemingly endless folks “can’t get permission from their significant other,” and “ah dang, I’ve got the kid this week and also every week that you guys go out,” and “Dang next time dog.”  Don’t sweat it. People flake, it is what it is. CAMO has been fortunate enough to have a solid 10 members who are die hard. 

    Social media is the best advertisement. There are some groups who do it far, FAR more than we do. These are the types of groups that admittedly, I steered away from. Some of these groups charge money. I just ethically can’t do that. I don’t own these lands and don’t expect anything in return for leading groups through them.

8.   How many is too many?

  • This is a weighted question. If the route is wide open, few obstacles, and you have a lot of camping options, you can ride 20+ without issue. If its tight and slow moving with a lot of obstacles, you’ll probably want to consider limiting it to 10-15 trucks.

9.   MY LEG!

  • Oh yeah, by the way, if someone gets hurt, they’re probably going to look at you, fearless leader. I encourage everyone have a medical kit specific to their needs in their vehicle. I also strongly request that all members coming on a sanctioned trip send me a message disclosing any personal medical conditions. I personally am a safety professional by trade and train in emergency response, first aid, and emergency extraction. My wife is also an RN. Many of our members are servicemen as well which helps tremendously should something happen. Don’t just buy bandaids and throw an EMT sticker on your truck, and don’t pretend to be competent if you’re not. Bare bones minimum, you need to **TRAIN** on the use of a tourniquet, carry hemostatic bandages, and have an assortment of gauzes and bandages/tapes, etc. I personally also carry a suture kit but there’s an extremely small chance that I’d ever deploy it.

10.   Establish rules

  • It’s difficult to be a stickler when all you want to do is have fun. Most of your rules are going to be common sense. Make sure you stick to them and offer no exceptions. Enforcement is a team effort within your group.

11.   Where am I supposed to sleep?

  • There are innumerable variables that can and will arise when on the trail. Part of your pre-planning needs to be Primary, Secondary, Tertiary, etc camp locations. No one wants to wheel deep into the night. (except that one time, but that’s a tale for another day)

12.   Let it go, Let it GOOOOOOO

  • Its not going to go perfectly. Usually, that’s where the stories come from. Someone is going to break, get lost, roads closed, gates locked, whatever. Brush it off. You’re out doing what you love with people who are happy to be there with you. Roll with those punches and don’t be afraid to consult your crew for their ideas on the next best move.

If you’re interested in following our adventures, our Instagram handle is @cam_overland and our facebook group is Central Appalachian Mountain Overland.

Keep it rubber side down.

    - Nick Cornell

Guides: Alldogs Offroad Titan Swap Guide

What is a Titan Swap? 


Titan swaps, otherwise referred to as tswap, is a modification made to the 2005-2019 D40 Nissan Frontier or 2005-2015 Nissan Xterra which extends the track width of the vehicle and gives the suspension a greater amount of upward and downward travel.  This increased travel makes for a more capable offroader Long travel suspension kits are common in the aftermarket and are offered by companies such as Dirt King and Total Chaos but are generally very expensive to the end user Cost can range in the $5k to $7k range, after including custom length axle shafts and custom coilover shocks.   

Some wild cats have found that the D40 Nissan Frontier and Xterra are able to use OEM 2004-2015 Nissan Titan front end components to mimic aftermarket long travel kits for a fraction of the cost.  The D40 Nissan Frontier and Xterra share the same front suspension mounting points for upper and lower control arms as the Titan There are also OEM front axle shafts which can be sourced for tswap.  What all this means is that a tswap enables the end user to produce a long travel suspension at a fraction of the cost of an aftermarket setup.  It also means that the components are readily and inexpensively available if replacement is needed.  The Nissan D40 Frontier and Xterra are very attractive platforms for truly capable offroaders.   

Titan swaps generally will lift your truck approximately 4”.  They will also increase the track width of your vehicle about 3” on driver and passenger side.  Keep this in mind, as some users may want to run spacers on their rear wheels to increase rear track width.  tswap will increase your travel to approximately 8” to 12” (depending on the coilover option used).  A stock D40 Frontier or Xterra has 5.8” of travel!   


How Do I Titan swap? 

Titan swaps involve a bit of preparation, as there aren’t a lot of companies offering an all-inclusive bundle.  Those that do generally have significant markup, making the tswap more expensive than it needs to be.  Generally, the most cost-effective way to piece together a tswap is to purchase the necessary OEM components from pick-and-pull parts yards or from websites such as Rockauto or your local OEM parts place (Oreillys, NAPAAdvanceetc).  There are some aftermarket components which are necessary to complete a tswap – the primary piece being the front coilovers.  Companies such as Radflo manufacture coilover kits custom tailored to the appropriate extended and collapsed shock lengths needed to get the most travel out of a tswap.  For the true penny-pinchers, there is also an option to run 3rd gen Toyota 4Runner or 1st gen Toyota Tundra front struts, though this option doesn’t offer as much travel as a custom coilover.   

Here’s a parts list for all the necessary items to successfully complete tswap: 

Front Lower Control Arms  

  • OEM Titan, new or used.  If choosing used, make sure that your bushings and ball joints are in good condition.  If choosing new, we prefer LCA’s with greaseable ball joints such as Mevotech Supreme (CMS30116 & CMS30117). 

Front Upper Control Arms 

  • Must be aftermarket to achieve proper alignment and travel.  We prefer SPC UCA’s as they are adjustable and make proper alignment much easier.  The correct partnumber is SPC 25560.  They also include greaseable ball joints. 

Front Tie Rods  

  • OEM Titan inner and outer tie rods can be used.  Otherwise, aftermarket tie rod extensions can be used to extend OEM Frontier / Xterra tie rods.   

Front Differential/Axles (Applicable to 4x4 Models 

  • If you plan on running the OE R180 front differential, you can source Infiniti QX80 axles as these have the correct extended length  (Rockauto P/N - NI8433).  Otherwise, you can find an M205 front differential from the Titan.  The M205 is significantly stronger than the R180 and will directly bolt into the Frontier / Xterra.  If the M205 is being used, Titan front axles are appropriate for use and you'll want to make sure you have the same gearing for the front and rear diffs.   

Coilovers/Struts 

  • OEM Titan and Frontier/Xterra coilovers and struts are too short for use in a Titan Swap.   They will not work.  Radflo has been making tswap-specific coilovers for the longest time.  They have ideal valving and extended/collapsed lengths and will net the most travel and the best ride of aftermarket options currently available. They come in 2.0”, 2.5”, and 2.5” w/ remote reservoir options.  They also have a variety of spring rates available to them.  Toyota 3rd gen 4Runner and 1st gen Tundra struts can be used to good effect but are generally a little too long and limit travel to approximately 7.5”.  With a custom tophat, travel can be extended to approximately 10”.    

Rear End 

  • Generally, you’ll want to increase the rear end height to level out your truck.  The best way to accomplish this is by a replacement leaf pack paired with extended shackles.  This will offer maximum articulation and the best ride.  If your stock leaf pack is in good condition, it is possible to use an AAL kit in combination with extended shackles to get the necessary height.  
If you're not interested in searching for components individually and you're looking for a one stop shop with all the necessary aftermarket pieces, we've got you covered! Check out the options we have below: