How do you offroad?

Your Vehicle

RSS

Blog

Tech: Regearing Nissan R180A, M205, and M226 Differentials

Regearing Nissan R180A, M205, M226, MA210, and MA248 Differentials

Hey guys!

This will be a living document / brain dump and will grow as more content is added to it.  It'll initially start out as a parts list reference for master rebuild kits as these are becoming scarce from the big names and it's becoming necessary for users to piece them together individually.  The conversation is mostly oriented around the Nissan 4x4 midsize applications from 2005 to present (Frontier, Xterra, R51 Pathfinder) but some information is also applicable to the full size applications (Titan, Armada).

If you've chosen to run larger tires on your Nissan 4x4, you may have noticed that the vehicle is a little more sluggish "off the line", has a little less "get up and go", or frequently downshifts / gear hunts when using cruise control.  The reason for this is when you change tire size, you're affecting your "drive ratios".  Your drive ratios can effectively be though of as the transistions which occur from engine crankshaft -> transmission -> transfercase -> differentials -> tires.  Through these transisions power output from the engine crankshaft is modified so that a driver has useable power to get their vehicle moving; most often multiplied through ratio reductions: for instance, three turns of the engine crankshaft to one turn of the transmission output shaft in first gear (3:1).  The functional purpose is to increase torque, the result of which is higher required engine rpm's.  

A 4x4 vehicle generally has 4 different components which affect drive ratios - 

  1. Transmission
  2. Transfercase
  3. Front & Rear Differential Gearset
  4. Tires

1. Transmission:

In an 05-19 Nissan midsize 4x4 like the Frontier, 05-15 Xterra, 05-12 R51 Pathfinder and full size Nissan Titan and Armada sold in the USA, you'll commonly find the Jatco 5R05 five speed automatic transmission or the six speed manual transmission.  

  5 Speed Automatic 6 Speed Manual
1st 3.84:1 4.37:1
2nd 2.35:1 2.52:1
3rd 1.53:! 1.74:1
4th 1.00:1 1.28:1
5th .84:1 1.00:1
6th N/A 0.77:1
Reverse 2.77:1 3.54:1

Specific to the Nissan Frontier, in 2020+ models Nissan began using a new 9 speed transmission.  I believe the same applies to the 2020+ Nissan Titan

  9 Speed Automatic
1st 5.42:1
2nd 3.26:1
3rd 2.25:1
4th 1.65:1
5th 1.22:1
6th 1.00:1
7th 0.86:1
8th 0:71:1
9th 0:60:1
Reverse 4.80:1


2. Transfercase:

These vehicles were commonly equipped with a selectable two speed transfercase.  The High speed is 1:1 and is what a driver will normally use in 2wd or 4wd.  The Low speed is 2.63:1 and would be used for offroading for torque / power multiplication at the sacrafice of reduced speed.  

3. Front & Rear Differential Gearset:

A variety of ring and pinion ratios came on these vehicles from the factory.  Common automatic transmission ratios are 3:13:1 and 3:36:1.  Common ratios for manual transmission equipped vehicles are 3.54:1 and 3.692:1.  

4. Tires:

Most commonly, the Nissan midsize applications were equipped with a 265/70r16 in non-Pro-4x trims and 265/75r16 in Pro-4x trims or equivelant; depending on the wheel size equipped to the vehicle from factory. 


Modifiying any one of these four components will have an impact on the ability of your engine to adequately accelerate and power your vehicle.   The most common modification by far which affects drive ratios is an increase or decrease in tire size.  For offroading purposes, we run lift kits so that we can run larger tires - larger tires improve under-vehicle clearance, approach angles, and improves the ability of the tire to roll over larger cracks and crevices than a smaller tire.  For these benefits gained, there is a cost to adding larger tires: increased tire circumfrence and increased weight - both of which affect drive ratios and the felt power of the vehicle.  To correct a change in drive ratio by stepping up to larger tires, the easiest of the three remaining components to modify is your front and rear differential gearset.  Modifiying the ratio of your ring and pinion will allow you to restore your factory drive ratios or even slightly improve them.  Choosing the correct ring and pinion ratio is very easy to calculate using an online calculator.  I like the calculator found HERE.  It's easy to input and compare different tire sizes and ring and pinion gear ratios to see how it affects vehicle RPM at given speeds.  

Most common to the applications we are currently covering, a person will choose to run a 33" equivelant tire like a 285/75r16 or a 285/70r17.  For demonstration purposes we will choose an 05-19 Nissan Frontier Pro-4x with an automatic transmission.  From factory this vehicle would be equipped with 265/75r16 tires and 3.36 gearsets.  I generally like to choose the top gear of a vehicle - this is normally an overdrive gear and will be a good representation of the engine working at it's hardest.  For the Pro-4x Frontier this would be "0.84".  

Here's a representation of different tire sizes and how they affect speed at given RPM's in overdrive with the 3.36:1 gearset:

  265/75r16 @ 3.36:1 (Factory Tire) 285/75r16 @ 3.36:1 (33" Tire) 315/75r16 @ 3.36:1 (35" Tire)
1000 RPM 33.36 MPH 34.61 MPH 36.47 MPH
1500 RPM 50.04 MPH 51.91 MPH 54.71 MPH
2000 RPM 66.72 MPH 69.21 MPH 72.95 MPH
2500 RPM 83.40 MPH 86.51 MPH 91.18 MPH
3000 RPM 100.08 MPH 103.82 MPH 109.42 MPH
3500 RPM 116.76 MPH 121.12 MPH 127.66 MPH

Here's a representation as above with 3.692:1 gearset:

  265/75r16 @ 3.692:1 (Factory Tire) 285/75r16 @ 3.692:1 (33" Tire) 315/75r16 @ 3.692:1 (35" Tire)
1000 RPM 30.36 MPH 31.49 MPH 33.19 MPH
1500 RPM 45.54 MPH 47.24 MPH 49.79 MPH
2000 RPM 60.72 MPH 62.99 MPH 66.39 MPH
2500 RPM 75.90 MPH 78.73 MPH 82.98 MPH
3000 RPM 91.08 MPH 94.48 MPH 99.58 MPH
3500 RPM 106.26 MPH 110.23 MPH 116.18 MPH

Here's a representation as above with 4.10:1 gearset:

  265/75r16 @ 4.10:1 (Factory Tire) 285/75r16 @ 4.10:1 (33" Tire) 315/75r16 @ 4.10:1 (35" Tire)
1000 RPM 27.34 MPH 28.36 MPH 29.89 MPH
1500 RPM 41.01 MPH 42.54 MPH 44.84 MPH
2000 RPM 54.68 MPH 56.72 MPH 59.78 MPH
2500 RPM 68.35 MPH 70.90 MPH 74.73 MPH
3000 RPM 82.02 MPH 85.08 MPH 89.67 MPH
3500 RPM 95.69 MPH 99.26 MPH 104.62 MPH


When choosing gearset ratios, I like to slightly underdrive from the factory numbers to account for added tire weight.  Most offroad tires are 10 ply and will be noticeably heavier than a factory 6 ply tire when sitting in the driver seat.  A heavier tire makes the engine work harder, as does a larger tire diameter.  A slight underdrive will also improve your crawl ratio when your transfercase is in 4Lo.  

My general recommendations are these when considering gears on an 05-19 Frontier, 05-15 Xterra, or 05-12 R51 Pathfinder with an automatic transmission and larger tires - 

33" - 3.692:1
35" - 4.10:1

For 05-19 Frontiers and 05-15 Xterras with a manual transmission, my recommendation would be as follows - 

33" - 4.10:1
35" - 4.56:1

When regearding a Nissan midsize 4x4 to a deeper (numerically higher) gearset - it would be ideal at the same time to swap out the R180A front differential for the M205 front differential found in the 03-15 Nissan Titan and Armada.  It is a stonger differential than the R180A with stronger corresponding CV axles and will better withstand the increased torque which is created with deeper gearing.  CV axles can be sourced from the V8 equipped Nissan R51 Pathfinder if you're not planning on a titanswap suspension.  The M205 is direct bolt-in upgrade for a user with an R180A axle, so long as the gear ratio is matched to the rear and corresponding CV axles are sourced.  


Nissan R180A Front Differential 

  • Applications -
    • 2005-2023 Nissan Frontier (2005-2019 27 spline inner CV; 2020-2023 30 spline inner CV)
    • 2005-2015 Nissan Xterra
    • 2005-2012 Nissan R51 Pathfinder (v6 models)
    • 2018-2019 Nissan Armada (30 spline inner CV)
  • Carrier Break - 3.54 Down / 3.692 Up
  • Notes -
Item Qty Required Nissan OE P# Aftermarket P#
Carrier Bearing / Race 2 38440-EA000 Timken 30208;
Carrier Shims 1 N/A Yukon SK-D35JL-CARRIER-RH
Pinion Front Bearing / Race 1 38140-EA000 Timken 32207
Pinion Rear Bearing / Race 1 38120-EA000 NSK R32-39; Koyo 332/32JR; NTN 332/32
Pinion Shims 1 N/A SKT8
Pinion Nut 1 38216-U301A  
Pinion Crush Sleeve 1 38166-EA000  
Ring Gear Bolt   38102-12S00  
Pinion Seal 1 38189-AR00A  
Drivers Side Seal 1 38342-EA000  
Passenger Side Seal 1 40227-EA000  


Nissan M205 Front Differential 

  • Applications -
    • 2003-2015 Nissan Titan
    • 2004-2015 Nissan Armada
    • 2008-2008 Nissan R51 Pathfinder (v8 models)
  • Carrier Break - N/A
  • Notes - Not a lot of traction device options - ARB airlockers are available and TJM recently started manufacturing an elocker.  
Item Qty Required Nissan OE P# Aftermarket P#
Carrier Bearing / Race 2 38440-8S110 LM603049 / LM603011
Carrier Shims 1 N/A N/A
Pinion Front Bearing / Race 1   M88048 / M88010
Pinion Rear Bearing / Race 1   M802048 / M802011
Pinion Shims 1   SKT8
Pinion Nut 1 38216-8S11A  
Pinion Crush Sleeve 1 38165-8S110  
Ring Gear Bolt   38102-8S110  
Pinion Seal 1 38189-8S110 710920
Drivers Side Seal 1 38342-8S110 710919 
Passenger Side Seal 1 38342-8S110 710919 


Nissan M226 Rear Differential, Gen 1 (2005-2019)

  • Applications -
    • 2005-2019 Nissan Frontier (Nismo, Pro4x trims)
    • 2005-2015 Nissan Xterra (Offroad, Pro4x trims)
    • 2003-2015 Nissan Titan
  • Carrier Break - N/A
  • Notes - This diff uses the same ring and pinion as a corresponding 07-18 JK Jeep Wrangler Rubicon.  The Rubicon factory 4.10 gears for elocker are thick-cut like Nissan M226 gears for elocker and should bolt in without the need for a ring gear spacer.  This applies to aftermarket gearsets, only if they are labeled as "thick cut".  


Item Qty Required Nissan OE P# Aftermarket P#
Carrier Bearing / Race 2   JLM704610 / JLM704649
Carrier Shims 1 N/A N/A
Pinion Front Bearing / Race 1   HM803146 / HM803110
Pinion Rear Bearing / Race 1   M88010 / M88048
Pinion Shims 1   55009
Pinion Nut 1 38216-8S10A 30271
Pinion Crush Sleeve 1   Dana 46925
Ring Gear Bolt     Yukon YSPBLT-006 / Dana 2003431
Pinion Seal 1 38189-ZJ00A DANA 2004101


Nissan M226 Rear Differential, Gen 2 (2020-Present)

  • Applications -
    • 2020-2024 Nissan Frontier (All trims)
  • Carrier Break - N/A
  • Notes - Starting in 2020 it appears Nissan has made changes to the head and tail pinion bearings used in this differential.  Master rebuild kits for the previous generation of M226 are not compatible.  There may also be carrier bearing changes, which will be verified shortly.  Axle shafts, wheel speed sensors, wheel bearings, and seals all appear to have carried over.  Nissan significantly downgraded the size of the front pinion bearing, which used to be a shared partnumber with Dana 60 axles in 2005-2019 axles.  The bearing and race are also now proprietary partnumbers for which there is no source for replacment.  If regearing a third gen Frontier it is strongly encouraged to use a 2nd Gen Frontier (2005-2019) rear axle as the basis for your build for strength and replacement parts availability. 


Item Qty Required Nissan OE P# Aftermarket P#
Carrier Bearing / Race 2   NP775796 & NP792716 (proprietary Timken p#, not currently available)
Carrier Shims 1 N/A N/A
Pinion Front Bearing / Race 1   Proprietary
Pinion Rear Bearing / Race 1   NP966883 / NP759177
Pinion Shims 1   55009
Pinion Nut 1 38216-8S10A 30271
Pinion Crush Sleeve 1   Dana 46925
Ring Gear Bolt     Yukon YSPBLT-006 / Dana 2003431
Pinion Seal 1 38189-ZJ00A DANA 2004101


Nissan MA210 Front Differential

  • Applications -
    • 2016-2024 Nissan Titan (non-XD models)
      • 2.93 ratio for 2016-2019
      • 3.692 ratio for 2020-2024
  • Carrier Break - 3.41 Numerically Down / 3.42 Numerically Up
  • Notes -
    • With the 2nd gen Titan, Nissan moved to an AAM manufactured front differential. Partnumbers appear to match those from 2014+ GM products (Chevy Silverado 1500 / GMC Sierra 1500)
    • Factory ratio for 2016-2019 is 2.93.  Factory ratio for 2020-2024 is 3.692.
    • Ring gear bolts are right hand thread!!
    • Carrier shim thickness
      • Passenger side - white paint marks - .2460" - OD 2.865", ID 1.8990"
      • Driver side - yellow paint marks - .2345" - OD 2.865", ID 1.8990"
    • Crush Sleeve Thickness - .5490"
    • Axle Shaft Spline Count - 28t
    • Pinion Shaft Spline Count - 30t
    • Pinion Depth Shim - .03450", stamped# 35
    • Carrier 3.41 numerically down P# 40038013 (discontinued, superceded by 15919119)
    • Carrier 3.42 numerically up P# 15801501


Item Qty Required Nissan OE P# Aftermarket P#
Carrier Bearing / Race 2 N/A KLM501349 / KLM501314
Carrier Shims 1 N/A  
Pinion Front Bearing / Race 1 N/A M802048 / M802011
Pinion Rear Bearing / Race 1 N/A M88048 / M88010
Pinion Shims 1 N/A  
Pinion Nut 1 N/A  
Pinion Crush Sleeve 1 N/A  
Ring Gear Bolt 10 N/A  
Pinion Seal 1 N/A  


Nissan MA248 Rear Differential

  • Applications -
    • 2016-2024 Nissan Titan (non-XD models)
      • 2.93 ratio for 2016-2019
      • 3.692 ratio for 2020-2024
  • Carrier Break - 3.41 Numerically Down / 3.42 Numerically Up
  • Notes -
    • With the 2nd gen Titan, Nissan moved to an AAM manufactured rear differential. Partnumbers appear to match those from 2014+ GM products (Chevy Silverado 1500 / GMC Sierra 1500)
    • Factory ratio for 2016-2019 is 2.93.  Factory ratio for 2020-2024 is 3.692.
    • Ring gear bolts are right hand thread!!
    • Carrier shim thickness
      • Passenger side - white paint marks - .2345" - OD 3.4640", ID 2.6510"
      • Driver side - yellow paint marks - .2335" - OD 3.4640", ID 2.6510"
    • Crush Sleeve Thickness - .5850"
    • Axle Shaft Spline Count - 33t
    • Pinion Shaft Spline Count - 32t
    • Pinion Depth Shim - .0275", stamped# 28
    • Carrier 3.41 numerically down P# 22943115 (open diff) / 23404623 G80 limited slip
    • Carrier 3.42 numerically up P# 22943115 (open diff) / 23404628 G80 limited slip


Item Qty Required Nissan OE P# Aftermarket P#
Carrier Bearing / Race 2 N/A JLM506849A / JLM506811
Carrier Shims 1 N/A  
Pinion Front Bearing / Race 1 N/A STA4895-1 / STA4895-1
Pinion Rear Bearing / Race 1 N/A HM88649 / HM88610
Pinion Shims 1 N/A  
Pinion Nut 1 N/A  
Pinion Crush Sleeve 1 N/A  
Ring Gear Bolt 12 N/A  
Pinion Seal 1 N/A  


Last updated - 3/14/2024

Tech: Coil Bucket Contact on 2005-Present Nissan Frontier & Xterra. What it is and How to Avoid It

Friends Don't Let Friends Run Spacers

It’s that time of year again friends! Spring is coming and we’re itching to lift some trucks. There are a lot of posts asking about whether this or that spacer lift is a good means for lifting a 2005-Present Frontier or Xterra. Unless you’re planning on budgeting for aftermarket upper control arms, the answer is NO.

On the 2005 to present Frontier and Xterra, Nissan positioned the forward leg of the upper control arm directly above the coil bucket. This is uncommon, most other manufacturers will have their UCA wrap around the bucket.

When you add a spacer to the top of your coilover, you’re increasing the overall length of the coilover assembly. With this added length, the lower control arm (LCA) is pushed further down than it would be without the spacer.
The LCA is connected to the spindle of the truck, which in turn is connected to the upper control arm (UCA). When you add a spacer and push the LCA further downward, you’re pulling the UCA with it.

 There’s not a lot of space between the UCA and the coil bucket on a stock coilover assembly when the suspension is unloaded, maybe 1/4” to 3/8”. When you add a spacer, you create a clearance issue called coil bucket contact. Even a 1/4” thick spacer plate that gives 1/2” lift can cause coil bucket contact.

In extreme cases, coil bucket contact can cause a UCA to fail. OEM UCA’s are stamped sheet metal. Coil bucket contact creates an audible clunk whenever the suspension cycles and the UCA hits the coil bucket.  It'll also leave a tell-tail mark where it's worn the chassis paint away from the coil bucket.  

To correctly and safely run a spacer, it’s necessary to run an aftermarket UCA with high clearance built into it. Having to budget in aftermarket UCA’s makes a spacer a non-budget-friendly means of lift. After spending money on a spacer kit and UCA’s, you’re just about to the cost of an aftermarket suspension lift kit.  If you're already running spacers and would like to eliminate cbc, check out our UCA's below.

ADO High Clearance UCA's

Coils are a much safer and better means of lifting these trucks and that’s why we created the Rckilla as a lower-cost alternative to a full lift kit. 

Rckilla for the Nissan Frontier

Rckilla for the Nissan Xterra


Tech - Titanswap on 2020-Present Nissan Frontier

Titanswapping the 2020+ Nissan Frontier

Recently we Titanswapped Chad's 2022 Nissan Frontier Pro-4x.  It was a very exciting process but also was a little challenging as we encountered some expected and unexpected changes which we are documenting here for you. 

Prior to the swap, Chad was running an ADO Koni Complete Kit with a 2" lift.  Before beginning the swap process we pulled one of the CV's to count splines.  Beginning in 2020 it appears Nissan changed the inner CV spline count where the CV mates to the R180 front differential.  The change is from 27-spline for 2005-2019 models to 30-spline for 2020-present models.  There is an off-the-shelf 30-spline CV that can be sourced, similar to the 27-spline CV a user would use on the 05-19 models.  Trakmotive part# NI8574 on Rockauto is the 30-spline CV that we used on our swap. 

We also noted in our first of two attempts at the swap that the thread pitch and diameter of the inner tie rod has changed at both ends.  On 2005-2019 models it is M16-1.5 where the inner tie rod mates to the outer tie rod.  On 2020+ models it is M14-1.5 where the inner mates to the outer.  We sourced an inner tie rod with the correct length and thread pitch at both ends but I'm not sure we would recommend it for use as it appears weaker than the OE Frontier tie rod.  We are currently working on heavy-duty 3" tie rod extensions for the new models which will be released in the near future.  

Other than this, almost everything remains the same!  Thanks for coming to our Ted Talk!  We also have a video on our youtube channel about Titanswapping the 2022 Frontier, check it out here!  

We will have kits listed for the 2020+ Frontier in the near future, stay tuned here

Tech: Understanding Camber Bolts and Their Relationship to a Lifted Vehicle

Understanding Camber 


Understanding Camber and Caster is critical to ensuring a properly configured alignment for your lifted Truck or SUV.  Camber and Caster are both detirmined by the relationship between your upper and lower balljoint.  Camber is the relationship between the upper and lower balljoint when looking at the vehicle head on, while Caster is the relationship of the two when looking at the vehicle from the side.  By using the adjustements afforded us by adjutable lower control arm bolts, or "Cam bolts" we are able to adjust our camber to help get our vehicle back into spec after modifying the suspension.  Below is a visual detailing how the adjustments can impact the location of your lower control arm.  The "Max Camber" on the visual below would cause your camber to be positive while the "Min Camber" setting would cause your camber to be negative.   The ideal camber setting is as close to 0 as possible 


Understanding Caster 


When it comes to lifted vehicles, camber bolts or "cam bolts" have more functions than merely getting a good alignment.  Cam bolts, when properly configured, can allow you to add positive caster to your alignment from the lower control arms.  This allows you to shift your tire forward in the wheel well to allow you to fit larger tires with less fender melting/trimming.  The same principle applies for our ADO Cam Bolt Lockout / Cam Bolt Delete Kit, which the visuals in this write up are modeled after.  When setting your alignment for a lifted vehicle, you ideally want to shoot for a caster number a bit higher than normal.  This helps tighten up your steering and can help improve ride quality after altering your suspension.  Leveraging your cam bolts to add caster will allow you to have a more mild caster setting on your upper control arms which in turn results in less tire rub.  Ideal caster numbers will vary slightly between vehicle platforms but at or above 3 degrees is a great place to be.  Properly configured LCA Cam Bolts can make the difference between rubbing and not rubbing when installing your larger tires.


Community: Translating Intakes

Thanks to community member Chris Gregg for writing this article!


Translating Intakes

Before starting this process, I spoke with other enthusiasts about their experience modifying automotive intakes. I wanted to know how they decided which intake to run, what information they wish would have been available from the start, and are there things they still find confusing. Given the inherent differences between engines (number of cylinders, engine displacement, single vs double overhead cams, etc) and the application of more complicated intake designs (single throttle body vs dual throttle bodies), it’s difficult to address everything someone might need to know about intakes in such a brief article. Therefore, we will be speaking generally on how intakes work, establishing the “rules of thumb,” so you can have an accurate understanding and ultimately make an informed decision for your particular application.

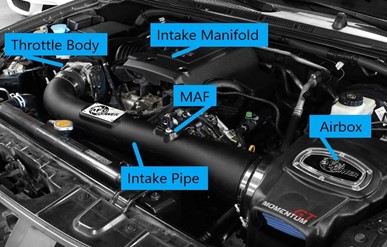
At a glance, factory intake systems still resemble early versions when fuel injection was at its infancy. You have a box that filters the air, an intake tube creating a pathway for air to travel between the filter box and engine, a throttle body controlling air entering the upper intake plenum, the upper intake distributes air into individual runners leading through the lower intake manifold and subsequently enters the head(s), where the air is finally directed into each cylinder by way of the intake valves. The role each component plays in affecting airflow into the engine is indeed complex. Adding to that complexity, modern engines incorporate systems like variable length intakes, swirl valves, and air straighteners that go unseen by most enthusiasts. How intake modifications subsequently affect engine performance is often based on the notion factory designs are restrictive and therefore diminish power and performance. Although this is often true for older vehicles (1980’s and 90’s), modern intake system designs have become progressively better designed and tend to flow air beyond what the engine needs under normal daily use. So then why does replacing the intake tube and filter on newer vehicles result in driver observations of improved throttle response and acceleration? Intake design is a balancing act between multiple factors for manufactures. A few examples being production cost, fuel economy, durability/longevity, and how changes impact the engine’s power-band. Just because a system flows well does not mean it performs equally across the power-band or that it is without limitations. To understand why a modification results in an improvement, we really need to know where the factory system least efficient?

As we begin talking about efficiency, it’s necessary to understand the relevance of atmospheric pressure, which is estimated at 14.7 pounds per square inch at sea level. Of course, atmospheric pressure will differ based on various factors such as elevation above sea level (less than 14.7) or below sea level (greater than 14.7 pounds per square inch). During a cylinder’s intake stroke as the piston travels down, air pressure is decreased inside the cylinder. The speed at which this occurs creates a sudden pressure difference between the low pressure at the cylinder compared to the higher atmospheric pressure outside of the intake system, resulting in air being drawn into the cylinder. Because engine cylinders access air through the intake system, they are not directly open to the atmosphere and subsequently will not see full atmospheric pressure – meaning a decrease in pressure at the cylinder occurs. The efficiency of the intake system ultimately determines how much atmospheric pressure is lost at the cylinder. The extent that an intake system either decreases pressure (bad for efficiency and power) or increases pressure (good for efficiency and power) is referred to as volumetric efficiency. Any part of an intake system that restricts airflow (slows it down) is considered a reduction to the intake’s volumetric efficiency. By identifying barriers and making changes to improve the intake system’s volumetric efficiency (achieving pressures closer to 14.7 pounds per square inch), we will subsequently improve engine performance because we have decreased the amount of pressure loss through the intake. To determine what causes intake restrictions/decreased pressure, let’s get a little more in-depth about behind-the-scenes functionality of factory intakes.


The starting point for air entering the system is the intake air box, which is at the furthest point from the engine. The primary purpose of the intake box is to house the air filter (more on that a little later). Depending on design, these boxes may draw air from outside the engine bay via a short tube running into the fender or location in front of the radiator/behind the grill. Intakes that draw air from outside the engine bay are referred to as Cold Air Intakes (CAI). In other vehicles the intake may pull air from the engine bay; possibly drawing air from behind the headlight, so that while the vehicle is stopped warmer air is collected. Once moving, the cooler outside air comes in around the headlight and grill making this intake design what is referred to as a Warm Air Intake (WAI). You will often see people refer to any intake that draws air from inside the engine bay as a Hot Air Intake (HAI) because air temperatures under the hood are naturally hotter than the air outside the vehicle.

It is important to understand where an intake system draws air in. Simply, warmer air reduces the power output of the engine while cooler air will increase power output. This is due to the fact cooler air has increased density; allowing a greater volume of air molecules to be packed into the same space. The benefit of cooler air is factored to be one horsepower for every ten degrees of change. Naturally this works both ways: consumption of 10* warmer air will result in one horse power loss and 10* cooler air will result in one horse power increase. That doesn’t sound like a whole lot, but when you figure air inside the engine bay can easily be 40* (or more) hotter than the air outside of the vehicle, you can see how temperature alone can result in a change of four horse power. For this reason, it is important to ensure the intake you choose is drawing air from the coolest source possible. Considering your typical daily routine, how much time do you spend sitting in slow moving traffic, higher speeds on the interstate, or off-road at low speeds and higher rpms/greater engine load? These are necessary questions to ask yourself in order to determine how to approach upgrading your intake system.

The next component is the intake pipe, which is effectively the super highway for air traveling from the air box to the throttle body. The intake pipe has several important components to note. First, the mass air-flow sensor (MAF) will look like a small box or “fin” with a group of wires plugged in to it. The MAF sensor reads a percentage of the air volume entering the intake as well as air temperature then communicates these readings to the engine control unit/module (ecu/ecm) in order to assist in maintaining proper fuel management. Specific to the ability of the MAF to properly function is the internal diameter of the intake pipe. Pipe diameter is often ignored when installing an aftermarket system, yet is critical given the MAF sensor is calibrated to measure a set percentage of incoming air volume based on the internal diameter of the pipe. If the aftermarket pipe was to have a larger internal diameter, instead of the MAF reading 10% of the air volume as calibrated, it may now only be reading 6%. The consequence is a leaner air/fuel mixture where the engine lacks sufficient fuel. If significant, a lean condition will inevitably cause damage to the engine. Another component of the factory intake pipe may look like a larger “box” attached along the side. This hollow box is called a Helmholtz Resonator. The Helmholtz is basically a muffler for the intake system, which significantly reduces intake noise. Although it is easy to assume the Helmholtz creates a restriction to airflow, the design places it on the outside of the intake pipe and therefore creates no impairment to the air traveling through the system. When installing an aftermarket intake, this component is excluded, becoming the primary reason intake noise is now more audible. It’s a common misconception that increased noise from an aftermarket intake is solely the result of increased airflow.

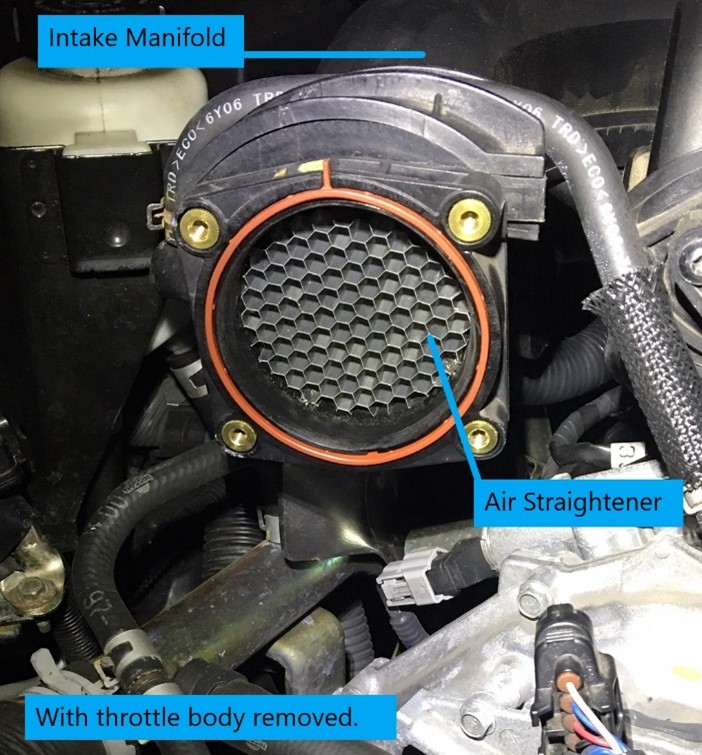
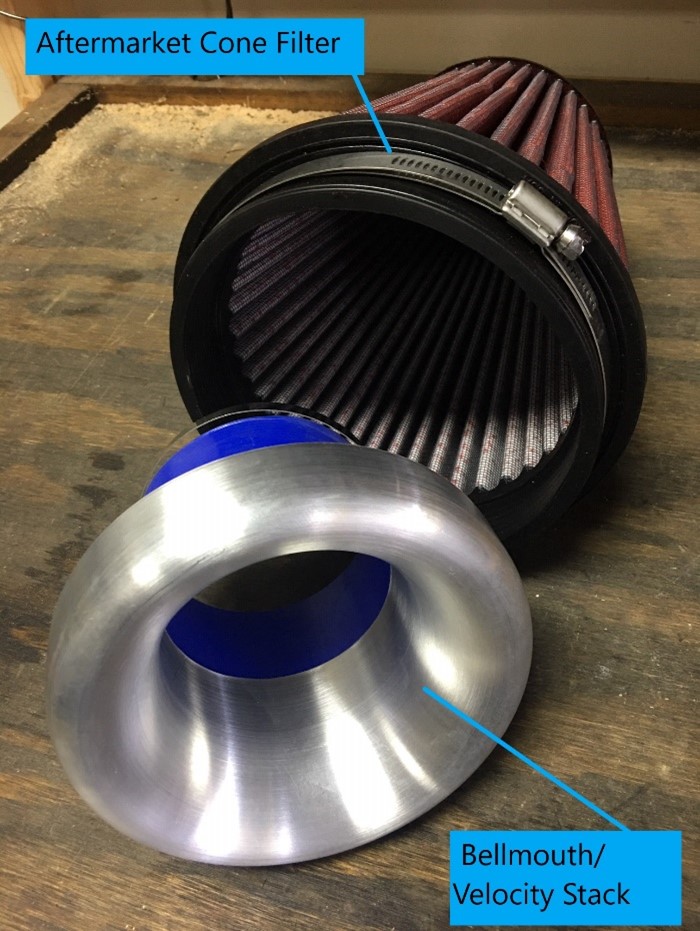
Depending on the factory intake design, it’s worth mentioning a couple other important engineering aspects to pay attention to. You may observe a honeycomb or cross-hatched screen at some point along the intake pipe, before and/or after the MAF, or immediately after the throttle body. These air straighteners are purposeful and necessary due to their ability to stabilize airflow. Air turbulence can be problematic because it acts as a type of restriction, causing decreased air volume further along the intake path or interfere with the MAF reading properly. Despite the straightener appearing to be an obstruction, it actually serves to increase volumetric efficiency by stabilizing the incoming air, improving intake air velocity, and inevitably aiding the air in forming vortexes (little tornadoes) further along the intake path. These vortexes are actually very organized and stable pockets of compacted air, a critical part of the airflow dynamics inside an intake. Second, inside the air box, you might observe a short section that is wide and turned outward at the opening, then narrows down to the same diameter as the intake pipe. This “bell” shaped opening is referred to as a velocity stack and aids the transition of air into the intake. Velocity stacks are like interstate on-ramps. Their purpose is to transition particles from a slow moving/high pressure side to the fast moving (high velocity)/low pressure intake side. Just like an on-ramp: the goal is to accelerate as you enter the flow of traffic on the interstate. Once on the interstate you have a greater volume of particles that are also traveling at a higher velocity. Another benefit of velocity stacks is that the transition of particles is smoother (less turbulent). As we have already discussed with air straighteners, reducing air turbulence is critical for maximizing airflow in order to get the most from your intake.

As we begin to consider installation of an aftermarket intake we need to take a look at the air filtration system. Inside the factory air box you will find a “drop-in” panel filter. The panel filter is designed to clean the air coming into the intake; removing dust, bugs, pollen, or other contaminants. Although they do a great job, factory filters tend to be restrictive and contribute to lower volumetric efficiency. Further consequences of a restrictive filter is that it takes more energy to pull air through. With the engine having to work harder drawing air in there is inherently a small loss of efficiency and power. Comparatively, performance filters offer a less restrictive material for significantly improved airflow and increased volumetric efficiency at the cost of filtration.

The most common filters you will see are the “oiled” or “dry-flow” filters. Aftermarket systems will include one or the other, with a select few giving you the option of which filter style you prefer. Oiled filters use an application of oil on the material to increase filtration by trapping contaminants. Dry flow filters refer to the absence of oil being used, leaving the material alone to trap contaminants. Both do an effective job at filtering, yet you will still see a lot of debate about which is best. The main argument centers on the use of oil and potential for it to damage your expensive MAF sensor. The reality is oiled filters don’t cause a problem when they are new. Problems result when owners remove the oiled filter, clean them, and then reapply fresh oil. Failure to allow the material to dry properly (Oil and water don’t mix!) and/or over saturation during re-oiling is to blame for oil being pulled from the filter material and coating the sensitive MAF; inevitably causing a failure. In the end, it’s up to you as the buyer to determine which best suits your needs. If you are comfortable cleaning and reapplying oil, then those types will work well for you. If you are not as comfortable, or simply wish to avoid the more extensive and costly cleaning process required of oiled filters, then the dry flow is likely the better choice. Additionally, given reduced filtration, use of an aftermarket filter should be given careful consideration if you live in an area with higher levels of dust, pollen, or other contaminants in the air.

If we were to simply install a less restrictive panel filter in the factory air box, we know it will reduce the amount of work the engine is doing to pull air in as well as improve the volumetric efficiency of the intake system. Now that the engine isn’t working as hard and the intake system is more efficient, a small amount of power is reclaimed, resulting in an estimated improvement of 3 to 5 horsepower and torque on most engines, specifically those with little to no other modifications. Certainly, factory engines that have larger displacement or are performance tuned from the factory may see more. Generally speaking, this is the maximum benefit that should be expected from installing a less restricting filter alone. This means simply upgrading from the factory drop-in air filter could achieve the same amount of power as installing a full aftermarket intake system. Depending on application, when a performance drop-in filter will typically cost less than $50 as compared to the majority of intake systems are over $150, that translates into a good amount savings for other mods that could add to your driving enjoyment. So under what circumstances does replacing the entire factory intake air-box and tube have any benefit?

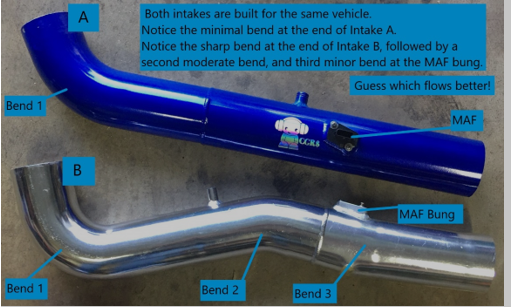
The factory intake itself can cause restrictions to airflow. These restrictions may be the result of build quality (material intruding into the intake path), pipe diameter, the number and severity of bends in the pipe, or poorly designed transitions between air passages. As the number and extent of restrictions increase, the more air volume and velocity will be reduced, resulting in lost efficiency. When looking at aftermarket options, systems that offer an improved build quality and a design that reduces the number and severity of bends is preferred. There is definite truth in the saying the best way to get from point A to point B is a straight line. So the more direct an intake path you can achieve, you can also expect increased air velocity and improved volume. Something else to consider when looking at aftermarket intakes is the construction material. You will notice they are most often made from either aluminum or plastic. Depending on your vehicle, the material could be a significant factor to consider. Aluminum will be more susceptible to absorbing heat from the engine bay, subsequently transferring some of that to the air flowing inside and increasing air intake temps. The pathway/location of the intake pipe will play a role in the extent heat affects the pipe, and should be considered when deciding which intake to buy. Keep in mind with certain applications, aluminum intakes will have little to no impact on intake air temps, so definitely don’t exclude aluminum as an option for your setup. This is an excellent example of how vehicle pages and forums can offer valuable information regarding different intake designs specific to your vehicle.

In regard to further stabilizing airflow for maximizing air velocity and volume there are a couple things we already know will work. You may have noticed that some aftermarket filters have a large opening where it is supposed to connect onto the intake. This opening is purposefully designed for a bell mouth/velocity stack. Velocity stacks are a fairly common component that are added to join intake pipes and aftermarket cone filters. As we already discussed, bell mouths help to smooth airflow as it transitions from the air filter into the intake pipe, further increasing air intake velocity as well as volume. While not all aftermarket intakes will have a velocity stack as part of the system, those that do are likely to outperform other intakes, specifically in the higher rpm range. For the truck community, the application of a velocity stack is less critical for low end power, but it will still function to smooth out airflow entering the system as well as provide a benefit to power in the upper rpm’s at no risk of losing power on the low end. A second way to stabilize airflow is to use an air straightener. While most aftermarket intakes fail to include these, likely due to added complexity and cost, they can be purchased individually and added into the system. Depending on the engine and other mods, you might expect to see 2hp from use of a bell mouth and/or air straightener. I think it’s important to emphasis, like all the other modifications we are discussing, bell mouths and air straighteners don’t “add” power, they reclaim power otherwise lost to inefficiencies inherent in system. By stabilizing airflow you can improve the MAF’s ability to monitor incoming air, increase air velocity as well as volume, and you allow the best conditions for vertices to form along the air path. This further enhances overall volumetric efficiency for the intake and provides engines the best opportunity to make the most power – limited only by restrictions elsewhere (ie. exhaust and tuning).

When considering intake options it’s necessary to discuss differences regarding intake length and the effect on engine performance. Although intake length should be viewed as the distance from the cylinder to the entrance of the intake system, any modification that increases or decreases the points between A and B applies to this topic. Simply, a shorter intake path will improve engine power in the higher rpm’s where a longer path will improve power in the low rpm’s. It’s worth noting, through the years more manufacturers have incorporated intake manifolds that are designed to offer the benefit of both. These variable intake air systems effectively shorten or lengthen the distance air travels before entering the combustion chamber. The result is a vehicle that benefits from both sides of the equation: allowing improved power down low when pulling out from a stop and once accelerated, shifting that power to the higher rpms where it is then most needed. The easiest way to alter intake length is to change the intake pipe itself. For truck owners that need low-end power for hauling, towing and climbing, keeping with a longer intake path is best. Conversely, lighter vehicles that benefit from power in higher rpm’s will benefit from a shorter intake path. While your factory manifold may use a variable intake, changing the intake pipe length will still have an effect on where in the rpm range engine power will exist. It’s worth emphasizing that typically you will not be gaining or losing power running a shorter or longer intake. You are simply moving that power up or down the rpm range of the engine. Once again we are back to the question about what you need from your vehicle given how you use it. Something to consider with shorter intake designs is the loss of a sealed air box which increases filter exposer to contaminants and allows the consumption of warmer air. Of course, if you want more power in the higher rpms, then it’s likely you will be traveling at a higher speed where increased airflow will drop under hood temperatures. At slower speeds, heat will further diminish engine power on the bottom end.

Regardless of the intake design you choose, pay close attention to filter placement and the potential for exposure to moisture. If the intake setup places the filter low on the vehicle or leaves the filter open it will be susceptible to submersion. If the filter is placed higher on the vehicle but remains exposed, it is still susceptible to water coming around the headlight and underneath the hood when raining or submersion if traveling through high water. The inherent design of true “cold air” intakes place the filter inside a boxed housing; reducing the ability for water contamination and submersion. Therefore, anyone looking for off-road adventures, choosing an intake that best protects the filter is ideal. It should go without saying, if water reaches your intake it is expected to also reach your engine, which would be catastrophic.

A critical component for off-road enthusiasts that builds on cold air intakes is the use of snorkels. Snorkels improve the intake’s ability to draw in air from the coolest source available. Not only is air pulled from outside the engine bay, it’s taken from an elevated position away from the heated asphalt/ground, and away from the vehicle’s body panels. Despite the notion snorkels are intended solely to keep moisture from entering the intake system during water crossings, they are also effective at providing the coolest air intake temps while also extending the intake path. As we have established at this point, these factors further benefit power in the lower rpm’s. However, there are limits – you can’t just keep extending the intake and it also continue to increase low end power indefinitely. Regretfully, there is a trade-off. Because we are adding bends to the intake path, there will be some degree of loss in volumetric efficiency. For this reason, the length associated with snorkels are not benefiting engine performance as much as the fact cooler air is being accessed. Given that snorkels can help drop intake temps several degrees, gains of 3 to 5 horsepower are reasonable, especially when compared to power achieved pulling air from warmer sources. Keeping in mind, under engine temps can get exceedingly high during off-road activities where little airflow and high engine rpms occur for extended periods of time.

Hopefully, this article has provided insight into the complexity of intakes and will aid in your search for the setup that best suits your needs. Once you have a clear picture of what your needs are, it definitely makes it easier to weed through the marketing behind generic descriptions and big claims manufacturers publish about their products. However, I cannot emphasize enough the importance of finding knowledgeable resources. Although many look to the social media groups for answers, these tend to be micro-responses, subsequently lacking the depth and comprehensive knowledge which can be found elsewhere. Above all, don’t hesitate to ask for additional resources or research on your own to further educate yourself. Without question, the guys at Alldogs Off-Road have the experience and knowledge to help get you the answers and products you need! Good luck and stay safe!

Special thanks to Jake Justice, Virginia Gregg, and Douglas Sands!


Guides: How Large of A Tire Can I Fit On My 2nd Gen Nissan Frontier?

How big of a tire can I fit? :D

Awesome, you've just lifted your truck 2" with one of our ADO Complete Kits and now it's time for some new rubber!  A common question that we see being asked is "how big of a tire can I fit on my truck?  While this guide isn't going to directly answer that question for you, it will help you when it comes to making wheel and tire purchasing decisions for your lifted second generation (2005-2020) Nissan Frontier.  

Can I fit 33's?

Most guys and gals when looking for new tires for their 2nd gen Frontier are looking to fit a 33" tire.  33" tires give great ground clearance, fill out the wheel wells nicely, and (most importantly) do a better job of rolling over imperfections on the road and on the trail.  33" tires are certainly doable, but there are a couple things that you want to be mindful of - tire width and wheel offset.  These two variables (along with the amount of lift you're running) play a significant role in whether you'll end up with rubbing or clearance issues.  

Gimme the deets!

Tire width refers to the first series of numbers in a metric tire measurement - for instance, the "265" in 265/75r16.  This is a metric value for width of the tire, represented in millimeters.  The second series of numbers refers to the tire height.  Tire height is represented as a percentage of the tire width - for instance, the "75" in the given example means that the tire height is a value that is 75% of the tire width.  The final series represents the wheel diameter the tire is manufactured to fit - for instance, a 16" diameter wheel.  

Wheels are manufactured to specific dimensions which include: wheel diameterwheel widthbolt pattern, backspace, offset, bore diameter, and load rating.

2nd gen Frontier's most commonly come from the factory with either a 16" or an 18" diameter wheel, depending on the trim level of the truck.  The factory width is 7" on the 16" wheel and 7.5" on the 18" wheel.  The bolt pattern is a 6x4.5", also represented as 6x114.3mm.  The bore diameter on a 2nd gen Frontier is 66.1mm.  The factory 16" and 18" wheel is a +30mm offset. 

Goodness gracious, that's a lot of info!  No sweat though, we just want to focus on tire width and offset right now.  We've defined tire width but we haven't defined offsetoffset is the distance from the hub mounting surface to the centerline of the wheel.  In practical terms, the offset value is what determines the amount of wheel and tire "poke" you have, or how much the wheel is positioned inward or outward of the wheel well, and is represented in millimeters.  The lower the offset value, the more the wheel is positioned outward of the wheel well.  Common offset values range from +30mm to -15mm.  

So what's the rub?  Well, boys and girls, the recipe for rub is a wide tire and a low/aggressive offset.  For instance, a 285mm tire width and a -12mm offset.  The principle at work here is that as you push the wheel out of the wheel well it has a greater arc of swing.  That combined with a wider tire reduces the clearance needed to make turns at full lock and makes for an unhappy driver and inner fender.   

So, what do you recommend?  

There are some things that can be done to help reduce the risk of rub.  One popular modification is the "melt mod".  This involves using a heat gun to heat up the plastic inner liner and remolding it to give additional clearance.  Sometimes it's necessary to get a little snippy and trim the inner liner for clearance.  If you're running an adjustable upper control arm like SPC UCA's along with adjustable lower control arm bolts, it's possible to shift the lower control arm fully forward to give clearance. 

Our basic recommendation is to not run an offset lower than +10mm and to not run a tire width greater than 285mm.  We're really big fans of 255mm and 265mm tires at ADO.  

Where's the chart?!

Keep in mind this chart is for reference purposes only.   

Wheel    Metric Tire Size    Diameter    Width    Notes    
16"  255/85r16 33.5 10.1" Skinny 33", Fits w/ Minimal Trimming w/ SPC UCA's and Cam Bolts
  265/70r16 30.6" 10.5" Stock SV Size
  265/75r16 31.6" 10.5" Stock Pro-4x Size, Recommended with ADO Rckilla
  275/70r16 31.2" 10.8"  
  285/70r16 31.7" 11.3"  
  285/75r16 32.8" 11.3" Melt Mod & Trimming Required.  Beware of Aggressive Offsets. 
17" 245/75r17 31.5" 9.7" Common Jeep Take-Off, Easy to Find and Inexpensive
  255/75r17 32.1" 10.1"  
  255/80r17 33.1" 10.1"  
  265/65r17 30.6" 10.5"  
  265/70r17 31.6" 10.5" Very Common, Inexpensive
  275/70r17 32.2" 10.8"  
  285/70r17 32.7" 11.3"  
  285/75r17 33.8" 11.3" Will Require Significant Work to Fit
18" 265/60r18 30.5" 10.5"  Stock SL Size
  265/65r18 31.6" 10.5"  
  265/70r18 32.6"  10.5"   
  285/65r18 32.6" 11.3"   
  285/70r18 33.7" 11.3" Will Require Significant Work to Fit
Projects: ADO Forged Steel Upper Control Arms

Guys, you've been looking at lift kits. Everybody is telling you that in order to run the lift you want to run you'll need aftermarket upper control arms: "Your caster is going to be whack". So, you hit your favorite forums, Facebook groups, and subreddits to find the recommended brands. You get some info and hit your favorite retailer. You see the price... W.H.A.T.?!

Here's the thing - quality aftermarket upper control arms are expensive. Really expensive. They range from $500 to $800 to the end user and in most cases they're required if you're running more than 2" of lift on a vehicle with independent front suspension. We're here to tell you it doesn't have to be this way.

We can bring you upper control arms which correct for lift. We can do this for almost half the cost. We can do this leveraging American manufacturing and North-American raw materials. We've been in the automotive aftermarket industry for a decade. We can do it all. Well... almost all. What we can't do? Tooling costs.


Sound like something you'd be interested in?  Check out our Ingiegogo crowdfunding campaign!  We're crowdfunding in order to overcome the steep tooling costs required to produce closed-die forgings.  Link HERE for more info:

https://www.indiegogo.com/projects/american-made-forged-steel-upper-control-arms#/

If we can hit our goal before the close of the campaign we will be having UCA's manufactured for the following applications:

To help make this project a reality we've applied for and been awarded a grant from the State of Nebraska.  We're really excited for this project.  Help us get the word out there and help us make this project a reality!


Community: Get involved, get outside!

Are you looking to get your 4x4 outside and adventure but don't know where to start?

We've selected three offroading clubs across the US who share our passion for conservation, offroading, and adventure.

US East -

Central Appalachian Mountain Overland (CAMO) is a gathering of like minded individuals with shared love of outdoors, camping, offroad, and exploration. They pride themselves in being family friendly and planning beautiful routes though Pennsylvania, Virginia, West Virginia and surrounding areas.

US West -

NORAC 4x4 is centered around one core philosophy:

"We all are here for one reason and one reason only, our love of the wilderness, our want to do something good for the public, and to have fun wheeling."

NORAC (Nissan Offroad Association of Colorado) was founded by Nissan Offroad enthusiasts, but welcomes anyone who shares in their mission of conservation, community service, and offroading.

Midwest -

Flatlands Overland and Offroad (FLOOR) is local to Alldogs HQ, and exists to bring enthusiasts together, and get people outside.


These clubs are more concerned with the quality of members rather than the brand of vehicle they drive. We hope you can get involved with one of the groups and make lifelong friends as well as help keep our forests clean for those who come after us.

Tech: Cheap Shock Showdown / Cross Reference Chart

Hey guys!

We've spent some time compiling the extended and collapsed lengths of a number of budget-friendly aftermarket and OE replacement shocks and struts.  This is important information as it represents the amount of wheel travel a shock or strut will allow in a given application.  Note that this data isn't exhaustive and/or tell a full story about which is "best".  Besides the information recorded here there is data which we haven't had the opportunity to document such as force curves of each dampener, shock shaft diameter, shock body diameter, the quality of the seals used, the type of oil used, etc.  We hope to acquire a shock dyno in the future to provide the data necessary for a consumer to make educated purchasing decisions.  

Note that measurements provided are in inches and that these measurements are eye-to-eye or eye-to-stem measurements as provideded by a manufacturer.  Also note for Toyota 120 and 150 Series applications the Toyota 4Runner was used and for some applications some manufacturers may call for a differing partnumber (there may be differences in valving but the lengths are the same from T4R to FJ to GX).  


2G Tacoma Front Partnumber Extended Length Collapsed Length Travel
Warranty Duration
Bilstein 5100 24-239370 22.56 17.03 5.53 Limited Lifetime
OME 90021 21.38 16.26 5.12
3 Year / 37k Miles
Dobinsons GS59-220 21.97 16.93 5.04 2 Year
Monroe Oespectrum 71371 22.39 16.89 5.50 Limited Lifetime
KYB Excel G 341340 21.73 17.59 4.14 Limited Lifetime
Gabriel Ultra G51739 21.36 16.79 4.57 Limited Lifetime
           
2G Tacoma Rear Partnumber Extended Length Collapsed Length Travel
Warranty Duration
Bilstein 5100 24-186728 22.94 14.02 8.92 Limited Lifetime
OME 60091 23.58 14.17 9.41
3 Year / 37k Miles
Dobinsons GS59-705 23.82 14.25 9.57 2 Year
Monroe Oespectrum 37270 22.20 14.06 8.14 Limited Lifetime
KYB Excel G 344410 22.32 13.50 8.82 Limited Lifetime
Gabriel Ultra G63885 22.24 13.56 8.68 Limited Lifetime
           
3G Tacoma Front Partnumber Extended Length Collapsed Length Travel
Warranty Duration
Bilstein 5100 24-263108 22.22 17.58 4.64 Limited Lifetime
OME 90021 21.38 16.26 5.12
3 Year / 37k Miles
Dobinsons GS59-220 21.97 16.93 5.04 2 Year
Monroe Oespectrum 71371 22.39 16.89 5.50 Limited Lifetime
KYB Excel G 341340 21.73 17.59 4.14 Limited Lifetime
Gabriel Ultra G51739 21.36 16.79 4.57 Limited Lifetime
           
3G Tacoma Rear Partnumber Extended Length Collapsed Length Travel
Warranty Duration
Bilstein 5100 24-186728 22.94 14.02 8.92 Limited Lifetime
OME 60091 23.58 14.17 9.41
3 Year / 37k Miles
Dobinsons GS59-705 23.82 14.25 9.57 2 Year
Monroe Oespectrum 37280 22.40 13.76 8.64 Limited Lifetime
KYB Excel G 349010 22.64 13.54 9.10 Limited Lifetime
Gabriel Ultra G64006 22.75 13.81 8.94 Limited Lifetime
           
Toyota 120 Front Partnumber Extended Length Collapsed Length Travel
Warranty Duration
Bilstein 5100 24-239370 22.56 17.03 5.53 Limited Lifetime
OME 90021 21.38 16.26 5.12
3 Year / 37k Miles
Dobinsons GS59-220 21.97 16.93 5.04 2 Year
Monroe Oespectrum 71371 22.39 16.89 5.50 Limited Lifetime
KYB Excel G 341340 21.73 17.59 4.14 Limited Lifetime
Gabriel Ultra G51739 21.36 16.79 4.57 Limited Lifetime
           
Toyota 120 Rear Partnumber Extended Length Collapsed Length Travel
Warranty Duration
Bilstein 5100 33-187174 23.50 14.91 8.59 Limited Lifetime
OME 60004 22.83 14.01 8.82
3 Year / 37k Miles
Dobinsons GS59-705 23.82 14.25 9.57 2 Year
Monroe Oespectrum 37270 22.20 14.06 8.14 Limited Lifetime
KYB Excel G 344410 22.32 13.50 8.82 Limited Lifetime
Gabriel Ultra G63885 22.24 13.56 8.68 Limited Lifetime
           
Toyota 150 Front Partnumber Extended Length Collapsed Length Travel
Warranty Duration
Bilstein 5100 24-196499 22.48 17.58 4.90 Limited Lifetime
OME 90010 21.38 16.26 5.12
3 Year / 37k Miles
Dobinsons GS59-700 21.85 17.01 4.84 2 Year
Monroe Oespectrum 71371 22.39 16.89 5.50 Limited Lifetime
KYB Excel G 340085 21.81 17.57 4.24 Limited Lifetime
Gabriel Ultra G51739 21.36 16.79 4.57 Limited Lifetime
           
Toyota 150 Rear Partnumber Extended Length Collapsed Length Travel
Warranty Duration
Bilstein 5100 33-187174 23.50 14.91 8.59 Limited Lifetime
OME 60080 23.74 14.49 9.25
3 Year / 37k Miles
Dobinsons GS59-705 23.82 14.25 9.57 2 Year
Monroe Oespectrum 37270 22.20 14.06 8.14 Limited Lifetime
KYB Excel G 349185 21.61 13.14 8.47 Limited Lifetime
Gabriel Ultra G63885 22.24 13.56 8.68 Limited Lifetime
           
Nissan D40 Front Partnumber Extended Length Collapsed Length Travel
Warranty Duration
Bilstein 5100 24-187053 15.26 10.55 4.71 Limited Lifetime
OME 90003 15.35 11.30 4.05
3 Year / 37k Miles
Dobinsons GS45-642 15.16 11.26 3.90 2 Year
Monroe Oespectrum 71102 15.56 10.99 4.57 Limited Lifetime
KYB Excel G 341467 14.96 11.02 3.94 Limited Lifetime
Gabriel Ultra G51766 15.56 10.99 4.57 Limited Lifetime
Nisstec MK84 N-MK84-CO 15.50 10.82 4.68 1 Year
           
Nissan D40 Rear Partnumber Extended Length Collapsed Length Travel
Warranty Duration
Bilstein 5100 24-187152 21.65 13.84 7.81 Limited Lifetime
OME 60017 22.01 13.78 8.23
3 Year / 37k Miles
Dobinsons GS45-645 21.85 14.13 7.72 2 Year
Monroe Oespectrum 37273 21.08 13.43 7.65 Limited Lifetime
KYB Excel G 345067 21.06 13.38 7.68 Limited Lifetime
Gabriel Ultra G64031 21.19 13.50 7.69 Limited Lifetime
           
Nissan 2GX Front Partnumber Extended Length Collapsed Length Travel
Warranty Duration
Bilstein 5100 24-187053 15.26 10.55 4.71 Limited Lifetime
OME 90003 15.35 11.30 4.05
3 Year / 37k Miles
Dobinsons GS45-642 15.16 11.26 3.90 2 Year
Monroe Oespectrum 71103 15.56 10.99 4.57 Limited Lifetime
KYB Excel G 341468 14.96 11.02 3.94 Limited Lifetime
Gabriel Ultra G51765 15.56 10.99 4.57 Limited Lifetime
Nisstec MK84 N-MK84-CO 15.50 10.82 4.68 1 Year
           
Nissan 2GX Rear Partnumber Extended Length Collapsed Length Travel
Warranty Duration
Bilstein 5100 24-187169 20.87 13.54 7.33 Limited Lifetime
OME 60017 22.01 13.78 8.23
3 Year / 37k Miles
Dobinsons GS45-645 21.85 14.13 7.72 2 Year
Monroe Oespectrum 37276 20.25 12.80 7.45 Limited Lifetime
KYB Excel G 345068 20.15 12.87 7.28 Limited Lifetime
Gabriel Ultra 69595 20.34 12.83 7.51 Limited Lifetime
           
Mitsubishi 3G Montero Front Partnumber Extended Length Collapsed Length Travel Warranty Duration
Bilstein 4600 24-062718 18.58 16.65 1.93 Limited Lifetime
OME 90006 18.66 12.99 5.67 3 Year / 37k Miles
Dobinsons GS43-783 18.58 13.11 5.47 2 Year
Monroe Oespectrum 71357 18.69 12.92  5.77  Limited Lifetime
KYB Excel G 341251  18.58 13.58 5.00 Limited Lifetime
Gabriel Ultra G51839 18.58 13.34 5.24  Limited Lifetime
           
Mitsubishi 3G Montero Rear Partnumber Extended Length Collapsed Length Travel Warranty Duration
Bilstein 4600 24-062725 22.30 13.98 8.32 Limited Lifetime
OME 60017 22.91 15.12 7.79 3 Year / 37k Miles
Dobinsons GS43-784 22.64 13.98 8.66 2 Year
Monroe Oespectrum 37250 23.20 14.00  9.20  Limited Lifetime
KYB Excel G 344300  22.68 13.86 8.82 Limited Lifetime
Gabriel Ultra G64036 22.67  13.66  9.01  Limited Lifetime
Guides: What are Aftermarket Upper Control Arms and When Do I Need Them?

What are Aftermarket Upper Control Arms and When Do I Need Them?


Anyone who spends more than 5 minutes on an offroad forum will find the topic of aftermarket control arms, also known as UCA, discussed quite a bit.  But you may wonder: what does an upper control arm do?

Upper control arms are found on independent front suspension (IFS) vehicles and generally connects the top of the spindle to the frame.  The UCA is generally not a load bearing piece of an IFS suspension; rather, its purpose is to guide your spindle in a pre-determined motion when your suspension cycles up or down.  Load is usually handled by the lower control arm, which connects to the lower portion of the spindle.  


What makes an aftermarket UCA an upgrade over my factory arm?

There are 3 major differences between a factory UCA and an aftermarket UCA:

Strength:

Even though the upper control arm may not support load there will still be a degree of forces transferred through the spindle into the upper arm.  A number of OE style arms are formed from sheet metal (for instance, in Nissan and Toyota applications).  Aftermarket arms are usually made from DOM tubing or they're forged in steel or aluminum rather than being formed in sheet metal.  Sheet metal arms are advantageous for a OE manufacturer, they can be mass produced in huge quantities quickly and inexpensively.  Aftermarket arms are fabricated in smaller batches and are generally more expensive due to the materials being used.  You'll notice the difference in cost if you look up your vehicle on Rockauto or other OE parts houses and compare to aftermarket arms.  Aftermarket options are significantly stronger than factory arms.

The pivot point, where the UCA meets with the spindle is also much stronger in aftermarket options. This pivot point takes shape in the form of a ball joint or uniball.  We generally prefer ball joints in most cases (especially if they're user-greasable), as the pivot point is booted to prevent the ingress of dust, dirt, and road salt.  They require less frequent service or maintenance.  Uniballs are generally found on high performance / racing applications and aren't a great option for daily-drivers or weekend-warrior type builds.  They have a shorter service life than ball joints and are known to be noisy as they wear through their teflon liner.  

Clearance:

A common problem with factory upper control arms can be limited clearance at the coil bucket and at the spring.  This is an especially common problem in Nissan Frontier and Nissan Xterra applications and is commonly referred to as coil bucket contact (or CBC).  Aftermarket UCAs are designed to provide the clearances needed so you can beef up your suspension and not have to worry about your UCA contacting suspension components it shouldn't. 

Geometry Correction & Adjustability:

Most aftermarket arms come built with extra caster so when you beef up your suspension, you can keep your alignment in spec.  This is done by slightly altering the geomertry of the spindle.  Aftermarket options from Dirt King, for instance, have this correction statically integrated into the UCA and it is non-adjustable.  Aftermarket options from SPC are manufactured to allow for an alignment shop to adjust caster and camber by shifting the position of their unique ball joint design.  


When do I need aftermarket Upper Control Arms?

There are lots of misconceptions about when you need aftermarket upper control arms.  You will often see blanket statements on forums or Facebook groups such as “If you have X amount of lift, you need aftermarket UCAs.  No questions asked”. 

The answer to this question ultimately comes down to how you chose to lift your vehicle. 

Preload Lifts and Lift Springs:

If you lift your vehicle with lift springs or preload (for example, with Bilstein 5100 front struts or OME / Dobinsons front lift springs), your suspension will still cycle in the exact same range of motion.  This means that your full droop location and your maximum compression position will be the same.  Lift springs / preload simply make your vehicle settle at a different spot in your overall suspension stroke. 

Spacer Lifts & Extended Length Coilovers:

If you chose to lift your vehicle by increasing the extended length of your shock, your range of motion will change (for example, Radflo extended travel front coilovers or a Rough Country front strut spacer).  Lengthening your shock means you will have the same amount of travel, just moved down in position.  For instance, if your OEM shock is 18” extended length and 13” collapsed length and add a 1.5” tall spacer to it, your extended length is now 19.5” and your collapsed length will be 14.5”.  Overall stroke remains the same but requires your upper control arm to drop lower to compensate for the change in position / increased length. 

For Nissan applications, people find their OEM arm will crash into the top of the coil bucket when using spacer lifts or extended travel lifts (coil bucket contact / CBC).  For Toyota applications, the arm can end up contacting the spring.  Both are not ideal and can be solved by installing aftermarket upper control arms. 


What style of Aftermarket UCA is best for my application?

There are two primary styles of aftermarket upper control arm.  The first uses bushings at the frame mount with a booted ball joint at the spindle mount.  The second uses heim joints at the frame mount with a uniball / spherical bearing at the spindle mount. 

Balljoint Arms:

This style of arm is the most popular.  The balljoint is booted and greaseable which makes it very resilient to debris and poor weather.  The SPC implementation also has a high amount of adjustability, as previously mentioned.  The bushings at the frame mount also help to dampen vibration and prevent the driver from feeling every little bump and jolt.  Modern ball joints are extremely strong and if well maintained will be very resistant to failure.   

Uniball Arms:

Uniball Arms are very popular in racing applications because the heimed frame mounts allow more forces to be passed into the vehicle which allows the driver to be more in tune with what is happening at the tire.  At 100+ MPH in the desert this feedback is very valuable.   The uniball is also the arm of choice for racing applications because a uniball generally has a higher range of motion than balljoints.  This allows suspension travel to be pushed to greater degrees.  This is not a concern in non-racing applications however; your axles / cv's / lower ball joints will bind far before an aftermarket ball joint will.  The service interval for a uniball is more frequent than a booted ball joint.   Experts recommend servicing your Teflon lined uniball once every 3-4 oil changes. 

Thanks for reading! We hope this was a good intro to upper control arms and how they work.  Below are links to some arms we offer on our site.  


Toyota Tacoma SPC Arms 

Toyota/Lexus 120 & 150 Series SPC Arms

Nissan Frontier/Xterra SPC Arms

Nissan Frontier/Xterra Titan Swap SPC Arms